A replacement cup spout is a small part with a very specific job. The useful question is not whether it looks like the old one, but whether it belongs with your exact cup and can be assembled, inspected and cleaned as instructed. This guide helps you organize that decision, compare the RBUGR six- and sixteen-piece packs and build a practical routine for keeping clean spare parts ready.
Identify the cup before choosing the replacement
Start with the cup already in your home. Find its model information on the cup, its packaging, your order record or the manufacturer's instructions. Write down the model and any generation or size information you can confirm. A familiar brand name is a useful starting point, but it is not a complete compatibility specification.
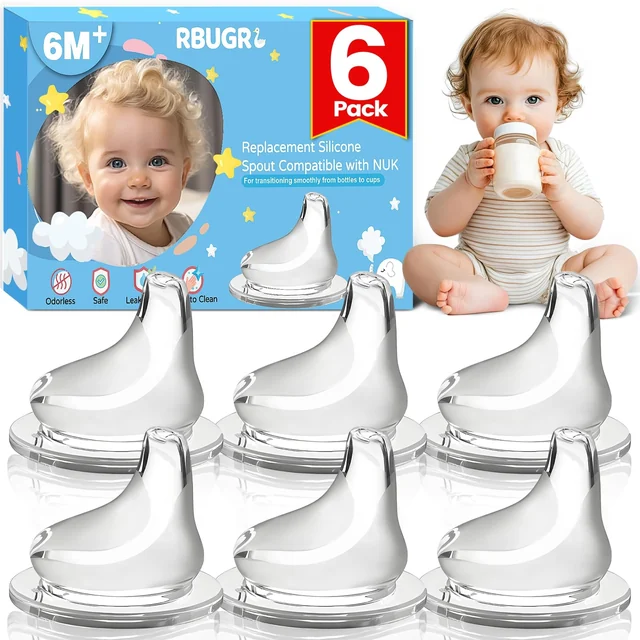
RBUGR's selected replacement-spout listings refer to compatible NUK Active and Learner cups with a stated 5 cm opening. That is the listing's compatibility description, not a claim that every cup sold under those family names will accept the part. Designs can differ, and the cup's original instructions should guide assembly and replacement decisions.
Keep the original part while you compare, provided it can be stored safely away from use if damaged. Photograph the cup, lid and part separately for your own reference. An organized comparison is easier than trying to remember whether a lip, flange or valve looked the same when you saw it several days earlier.
If the model cannot be identified, pause the purchase decision and ask for clarification through the product-question route. Ordering a larger pack will not resolve uncertainty about fit. The family essentials collection puts both available RBUGR quantities together, while each product page retains its own selected pack details.
Compare the whole part, not one measurement
A single diameter is a useful check, but it is not the entire fit. Compare the replacement's overall form with the original part, including the section that sits inside the lid and the way the drinking portion passes through it. Use the product photographs as visual references and the written compatibility information as the boundary of the listing's claim.
The RBUGR description identifies clear silicone construction, a two-line opening and an air valve. These are features to compare with the intended cup. They do not establish that the part will behave identically to the original or that a visually similar assembly is safe to use. Avoid stretching, cutting or otherwise altering a part to make it seem compatible.
Read measurements in the same units. The stated 5 cm opening is 50 mm; a measurement of a different part of the lid may not be comparable. Make a note of what was measured rather than writing down an unlabeled number. If you cannot tell which dimension the listing describes, ask before relying on it.
The goal is to reach a clear yes based on the model, the instructions and the complete fit, not to accumulate several approximate matches. Keep the cup manufacturer's guidance available as you review the six-piece product page.
Create a short compatibility record
A compatibility record can be a note on your phone or a card kept with spare parts. It does not need a complicated template. Include the cup model, the source of that identification, the replacement product and the date you checked the instructions. This makes the next purchase easier and helps another caregiver understand what belongs together.
| Check | What to record | If uncertain |
|---|---|---|
| Cup identity | Exact model and relevant size or generation | Find the original instructions or order record |
| Replacement scope | Models named by the listing | Ask the seller a specific question |
| Dimensions | Number, units and measured location | Do not compare unlabeled measurements |
| Assembly | How the part seats in the intended lid | Use the cup's instructions |
| Cleaning | Permitted methods for every component | Do not assume a heat method is allowed |
Keep the note factual. Write model confirmed from packaging rather than seems like the same cup. A short record with one unresolved question is more useful than a confident-looking checklist filled with guesses. If different cups are used at home and elsewhere, make separate entries instead of assuming the same replacement serves both.
When another adult helps with cleaning or packing, show them the matching components. A storage label can name the cup model without including a child's full name or other unnecessary personal information.
Read fit and leak feedback in context
Reviews can reveal the questions worth asking, but they cannot verify your particular assembly. In the six-piece RBUGR review sample checked on September 16, 2026, several customers described a successful fit and convenient cleaning. One customer found the silicone softer than the original, while another reported substantial leaking. These different experiences belong together in a useful product discussion.
A comment that a replacement fit perfectly does not identify every detail of that customer's cup. Likewise, a leak report may not contain enough information to diagnose its cause. We do not reinterpret either as proof of universal compatibility or as a definitive explanation of a manufacturing problem. The practical lesson is to check the exact combination you own.
Distinguish comfort or preference observations from technical specifications. Softer is a customer's comparison, not a measured material standard. A parent's positive experience with cleaning is not a certification of a sterilization method. Keep those observations as context while using the product and cup instructions for decisions.
The six-piece pack and sixteen-piece pack have separate rating counts in the captured Amazon listings. We keep those figures separate. A rating shown for one listing should not quietly become evidence for a different quantity or an assumed identical product.
Choose a quantity around a real rotation
Once compatibility is established, count how many compatible cups are actually in use. Then think about the gap between using a part and having it cleaned, fully dry and ready again. That practical rotation is a better basis for selecting a quantity than the attraction of the largest available pack.
For a household using only a small number of the same cup, a six-piece set may be enough to establish a spare supply. A sixteen-piece pack may make sense when more compatible cups or several locations are involved. These are planning examples rather than replacement schedules. The appropriate number depends on your routine, storage space and the condition of the parts.
Do not divide a pack count by an invented number of days to estimate how long it will last. Wear varies, and damaged parts should not remain in use simply because a planned replacement date has not arrived. Conversely, a new spare should be stored and prepared according to its instructions rather than treated as ready for immediate use straight from the shipping box.
Compare the current total price only after confirming that each listing is the item you intend to buy. Our prices are dated observations; use the purchase button for the selected pack to check the current offer and delivery information. Avoid changing the pack quantity merely to reach a perceived bargain before the fit question is settled.
Inspect the delivery before adding it to storage
On arrival, confirm the selected quantity and compare the delivered item with the listing and your compatibility record. Retain the packaging and any instructions. If the product differs from what you expected, resolve that before combining it with the household's existing spare parts.
Inspect each part under good light according to its instructions. Look for damage, an unexpected shape or another reason to question whether it should be used. Do not try to repair a damaged drinking part with adhesive or change its opening yourself. Replacement is a selection task, not a home modification project.
Complete the required first-use cleaning before moving parts into the clean supply. Keep unprocessed deliveries separate from cleaned, fully dry parts so another caregiver cannot confuse the two groups. A small labeled container is sufficient; the distinction matters more than buying an elaborate organizer.
If the order is damaged or incorrect, keep the order details and use the help options attached to that transaction. Our returns and order-help page explains where to begin. Do not publish order numbers or personal information when asking a general product question.
Build the cleaning routine around the instructions
Cleaning advice needs two inputs: appropriate public-health guidance and the instructions for the actual components. CDC guidance explains that feeding items should be separated for cleaning and allowed to air-dry thoroughly before storage.1 A component's own instructions determine which cleaning and heat methods it tolerates. Silicone construction alone does not establish permission for every method.
“Allow to air-dry”
CDC, cleaning infant feeding items1
Turn that principle into a layout that is easy to follow. Keep used items, the cleaning area and the drying area visibly distinct. Have the relevant instructions available to anyone sharing the work. If one component has different care requirements, record the difference instead of letting it disappear into a general household routine.
The guidance here is not a universal sanitizing recipe or an age-specific care plan. Follow the applicable manufacturer and healthcare guidance for your situation, particularly when an infant has additional medical needs. The CDC resource linked below gives the detailed public-health context; this article focuses on organizing the replacement decision.
After cleaning, inspect and assemble as instructed. A spare supply is useful because it allows the routine to proceed without reaching for a part that has not completed the required process. Extra quantity should support careful handling rather than shorten it.
Store by status and by cup model
A useful storage system answers two questions immediately: is this part ready, and which cup does it belong to? Group compatible clean, dry parts together and keep the model label with them. If you use several cup designs, avoid a single mixed container where parts are selected mainly by appearance.
Store the original packaging or a clear copy of the relevant product information nearby. Keep it separate from the parts if it would make the clean area cluttered. The information should remain easy to retrieve when you need to confirm a model, care instruction or reorder reference.
Create a distinct place for items awaiting inspection or disposal. A damaged part should not drift back into the ready supply after a busy cleanup. This is especially helpful when more than one person handles the cups: a clear physical separation is more reliable than expecting everyone to remember a verbal warning.
Periodically review the supply when a cup is retired or your routine changes. A large collection of mismatched spares is not automatically useful. Keep what can be positively matched to current equipment and handle the rest appropriately. The objective is a manageable set of known parts, not the largest possible backup drawer.
Make handoffs between caregivers straightforward
For a caregiver handoff, prepare the information the next person actually needs: the correct cup and replacement, the assembly instructions, the cleaning requirements and where unused spares are kept. A concise written note is easier to follow than a lengthy explanation delivered while someone is leaving the house.
Demonstrate the intended assembly using the instructions, and invite questions about anything that looks different from the original. Do not use the demonstration to normalize a forced or improvised fit. If the setup raises uncertainty, resolve it before use rather than passing the uncertainty to the next caregiver.
For parts kept at another location, confirm that the cup there is the same model. Similar appearance is not enough. A family may own cups bought at different times, and the replacement record for one does not automatically apply to the others. Label the location's supply with the relevant cup information.
Keep personal details out of any public review or photograph you later share. A useful product review can describe the model, fit and experience without showing a child's face, location, school or daily schedule. This also produces more informative feedback for other shoppers than a photo with little compatibility context.
Turn a problem into a precise question
If a replacement does not behave as expected, stop and review the exact model, the delivered part and the assembly instructions. Describe the observation concretely: where liquid appeared, whether the part seated as shown, and what differed from the expected setup. Those facts are more useful for support than saying only that the product is bad or does not work.
Do not keep experimenting by cutting the opening, stretching a flange or substituting unrelated valves. This guide cannot diagnose the assembly remotely, and a review thread is not an instruction manual. Use the seller's product-question channel or the original cup manufacturer's guidance when compatibility remains unclear.
When contacting order support, include the selected pack and the relevant product reference privately through the order system. Keep the original packaging until the issue is resolved. The contact and support page explains the distinction between general product information and help connected to a transaction.
If you write a review afterward, mention the exact cup model where possible and distinguish what you observed from what you suspect caused it. That makes your experience more useful to the next shopper without turning one household's outcome into a claim about every compatible cup.
A final checklist before choosing your pack
Confirm the model, the stated compatibility and the complete part shape. Read the care information and establish a place for cleaned, dry spares. Choose a quantity based on the number of compatible cups and your actual rotation. Then open the selected product's purchase destination and check the current pack, price and delivery details.
The RBUGR assortment includes six- and sixteen-piece options, but the most useful choice is the one you can positively match and sensibly manage. Review scores can add context about other shoppers' experiences; they cannot resolve a missing model number or establish a method that the instructions do not permit.
For other household planning projects, browse the RBUGR journal. The small-gift guide follows the same practical principle: select a quantity around an actual plan rather than buying a large pack first and inventing a use later. These are separate product categories, with separate handling requirements.
Keep a clear reorder record
Once you have confirmed a suitable replacement, save the exact product reference with the cup model and the selected quantity. A general search for clear silicone spout may produce something that looks close but belongs to a different system. Your record should make the next comparison easier without encouraging an automatic purchase of an unchecked listing.
Revisit the record when a cup changes, a new generation is introduced into the household or the delivered replacement looks different. Compare the current information, not just an old product photograph. A previous successful purchase is useful context, but it does not replace checking the next item and its instructions.
Keep this small record where everyone responsible for ordering can find it. That reduces duplicate purchases and prevents a well-intentioned helper from selecting a large pack based only on a familiar brand name. The aim is a straightforward routine with positively identified parts.
Sources and editorial notes
This original guide was prepared by RBUGR Editorial using the selected product descriptions and a dated sample of Amazon reviews. It is not an independent fit test, a NUK endorsement or a pediatric care plan. NUK is named solely to explain the listing's stated compatibility. Information was checked on September 16, 2026.
- CDC: How to clean, sanitize and store infant feeding items. Refer to the full guidance and your components' instructions for the methods appropriate to your circumstances.